
Ever since its release in 2016, Escape From Tarkov has caused a stir in the shooter community. The hardcore shooter, developed by Battlestate Games, calls for players to enter this shoot-and-loot conflict with tact and patience.
Tarkov offers a variety of missions, including the Gunsmith quests, for players to do along the route.
What is Gunsmith Part 1?
The Gunsmith Part 1 mission is accessible as soon as you reach Level 2 in Escape From Tarkov. Neither the flea market nor LL2 traders are required to finish this portion of the Gunsmith quest.
You’ll receive the Gunsmith Part 1 task from the mechanic. His conversation is as follows, courtesy of the Tarkov Wiki:
Good day, mercenary. Mechanic, that’s me. Did you wish to lend a hand? Let’s get right to it. Today’s workload is quite heavy. The PLC100 programming unit has broken, and there isn’t much time left.
Those weapons orders, too… Here is the reason I’m telling you this, though. I’ll need some assistance because I modify and create a variety of firearms for my customers.
I won’t have time to put together an MP-133 myself, and I don’t have the components either, therefore I need you to do it. This firearm ought to have more than 47 ergonomics, a laser designator, an extended magazine, and a recoil sum of no more than 850.
And little, with no more than four spots. Build one for me so we can discuss future projects.
Once you accept the task, your objective is to obtain an MP-133 weapon and two additional components to upgrade it with.
Once you’ve done this, give in your quest (along with the rifle) and celebrate since the mission is now finished.
Related: Grindstone Recipe: Check Out The Required Materials And The Whole Procedure To Make A Grindstone!
Regarding all of the Gunsmith quests, there are four things you should be aware of:
- When turning in a firearm for a quest, make sure the barrel is empty and free of any bullets.
- To be eligible for a return, a gun’s durability must be 60 or above. Guns can be fixed, but every repair lowers its durability; if your gun’s durability is already 60 or lower, you will need to buy a new one. The good news is that all the parts simply need to be moved to the new base after you obtain the gun’s base.
- We will indicate from which merchant each component can be purchased next to it. The majority of the pieces may, however, also be purchased in flea markets, and you will probably need to do so since leveling traders take time.
- While working on gunsmith components can be expensive, keep in mind that you will always receive a respectable reward, so your net balance will frequently be zero.
Related: Auto Clicker For Chromebook: An Important Chrome Extension You Should Install On Your Device!
How to Finish the Gunsmith Part 1
This is the only Gunsmith mission that can be completed without the aid of LL2 traders or the flea market, as was previously mentioned. Use these if they are available to you in your Escape From Tarkov game! Once you’ve agreed to the quest, you’ll require these three items:
MP-133
The Mechanic will ask you to alter this particular weapon. He will sell you the weapon for a screwdriver and two exceptional pliers in exchange for them. If you don’t have these, we advise plundering Woods or Shoreline to acquire them.
Blue Laser LAM-Module NcSTAR Tactical
Skier will sell this item at loyalty level 2. Alternately, you’ll have to search for this item during a raid.
MP-133/153 Polymer Pistol Grip
Jaeger will offer this product for purchase at Loyalty Level 1. Alternately, you’ll have to search for this item during a raid.
Detailed Specifications
The MP-133 must, overall, meet the requirements listed below in order for the Mechanic to accept it after these additions.
- 60 Robustness
- 53+ Ergonomics
- 850 Recursion (or less)
- Four cells in space (or less)
- Additional Magazine (capacity of 6 or more)
- A tactical instrument (the NcSTAR Tactical Blue Laser LAM-Module fulfills this)
The pistol grip and laser must be added to the MP-133 in place of the stock once you have all three pieces. Then you can return the firearm and claim your rewards.
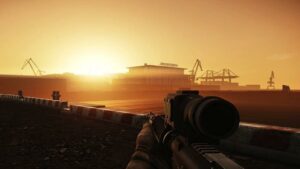
Building the Shotgun
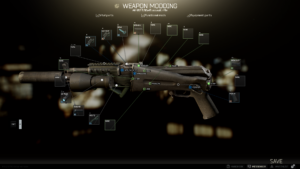
To Finish Putting the Shotgun Together for Trading
- Remove the shotgun’s 25 mm mount ring and flashlight.
- Discard the Trijicon RMR, Low profile mount for Trijicon RMR, and the Kiba Arms International SPRM mount for pump-action shotguns.
- Put the MP-133/153 Plastic Pistol Grip on.
- Add the NcSTAR Tactical Blue Laser LAM-Module.
Now that you have everything in place, you may sell the Trijicon RMR back to Mechanic or turn the shotgun into Mechanic along with it.
Related: Zedge App: Download Some Extraordinary Ringtones And Wallpapers For Your Device!
Incentives for Gunsmith Part 1
You receive a total of when you complete Gunsmith part 1.
- 6,500 characters maximum EXP
- The reputation of a mechanic: 0.04
- Amount: 20,000 rubles
- This GLOCK 17
- 50 rounds of 9mm Pst Gzh ammunition